Assessment of Patients’ Airway Including 1-2-3-Test
Introduction to Airway Assessment
Assessing a patient’s airway is critical in emergency medicine and anesthesia. The airway must be evaluated for patency, protection, and potential difficulties with interventions such as intubation or ventilation. A systematic approach can help healthcare providers identify patients at risk for airway complications.
1-2-3-Test Overview
The 1-2-3-Test is a mnemonic that helps clinicians assess the airway quickly and effectively. It focuses on three key anatomical measurements that can indicate the likelihood of difficult intubation:
- Interincisor Gap (1): This measures the distance between the upper and lower incisors when the patient opens their mouth as wide as possible. A gap of less than 3 cm may suggest difficulty with bag-mask ventilation or intubation.
- Thyromental Distance (2): This is measured from the thyroid notch to the mentum (the tip of the chin) with the patient’s neck in extension. A distance of less than 6 cm may indicate a higher risk for difficult intubation due to limited space for laryngoscopy.
- Sternomental Distance (3): This measurement is taken from the sternum to the mentum with the head in full extension. A distance of less than 12 cm can also suggest potential challenges during intubation.
Importance of Each Component
Each component of the 1-2-3-Test provides valuable information regarding potential difficulties in managing a patient’s airway:
- Interincisor Gap: A narrow gap may hinder effective bag-mask ventilation, which is crucial for maintaining oxygenation prior to intubation.
- Thyromental Distance: Limited thyromental distance can restrict access to the larynx during laryngoscopy, making it harder to visualize and secure the airway.
- Sternomental Distance: This measurement helps assess neck mobility and overall anatomical configuration, which are important factors influencing intubation success.
Clinical Application
In practice, if any one of these measurements suggests difficulty (i.e., interincisor gap < 3 cm, thyromental distance < 6 cm, or sternomental distance < 12 cm), clinicians should prepare for alternative airway management strategies. These might include using video laryngoscopy or considering surgical airway options if standard intubation fails.
Additionally, other assessments such as the Mallampati classification can complement this evaluation by providing further insight into potential difficulties based on oral cavity anatomy.
Conclusion
The 1-2-3-Test serves as a quick and effective tool for assessing a patient’s airway before performing procedures that require securing it. By systematically evaluating these three measurements, healthcare providers can better anticipate challenges and improve patient outcomes during emergencies or surgeries requiring anesthesia.
Different Classifications of Airway Structures
The airway structures can be classified into various categories based on their anatomical location and functional roles within the respiratory system. The primary classifications are as follows:
1. Upper Airways
The upper airways consist of structures located in the head and neck region that facilitate the entry of air into the body. These include:
- Nasal Cavities: The nasal passages serve as the main entrance for air, where it is filtered, warmed, and humidified.
- Sinuses: These are air-filled spaces within the bones of the skull that help to lighten the weight of the head and contribute to voice resonance.
- Pharynx: This muscular tube connects the nasal cavity to the larynx and esophagus, playing a role in both respiration and digestion.
- Larynx: Often referred to as the voice box, it houses the vocal cords and is involved in sound production as well as protecting the trachea against food aspiration.
2. Lower Airways
The lower airways comprise structures that lead directly into the lungs and are primarily responsible for conducting air to alveoli where gas exchange occurs. These include:
- Trachea: Commonly known as the windpipe, it is a rigid tube that extends from the larynx down into the thoracic cavity, branching into two main bronchi.
- Bronchi: The trachea bifurcates into left and right bronchi, which further divide into smaller branches called bronchioles.
- Bronchioles: These are smaller tubes that continue to branch out within the lungs and lead to alveolar sacs where oxygen and carbon dioxide exchange takes place.
3. Conducting Zone vs. Respiratory Zone
The airway structures can also be categorized based on their functional roles in respiration:
- Conducting Zone: This includes all airway structures that do not participate directly in gas exchange but serve to transport air. It encompasses parts of both upper (nasal cavities, pharynx, larynx) and lower airways (trachea, bronchi).
- Respiratory Zone: This zone is specifically involved in gas exchange and includes structures such as alveolar ducts and alveoli.
4. Functional Classification
Another classification can be made based on specific functions performed by these airway structures:
- Air Conducting Functions: Structures like nasal cavities, trachea, bronchi, and bronchioles primarily serve to conduct air.
- Gas Exchange Functions: Alveoli are specialized for exchanging oxygen with carbon dioxide between inhaled air and blood.
In summary, airway structures can be classified based on their anatomical location (upper vs. lower), their functional roles (conducting vs. respiratory), or specific functions they perform during respiration.
Technique of Tracheal Intubation
Tracheal intubation, also known as endotracheal intubation, is a critical medical procedure used to secure the airway in patients who are unable to breathe spontaneously or whose airways are compromised. The technique involves several steps that must be performed with precision and care to ensure patient safety and effectiveness of the procedure.
1. Preparation for Intubation
Before proceeding with tracheal intubation, healthcare providers must prepare adequately:
- Airway Assessment: A thorough evaluation of the patient’s airway is essential. This includes assessing any potential difficulties such as distorted anatomy, history of difficult intubations, or conditions like obstructive sleep apnea.
- Patient Positioning: Proper positioning is crucial for optimal access to the airway. The head should be positioned in a way that aligns the oral cavity, pharynx, and larynx (often referred to as the “sniffing position”).
- Preoxygenation: Administering 100% oxygen helps denitrogenate the lungs and prolongs safe apneic time, which is particularly important in patients at risk of hypoxia.
- Equipment Preparation: All necessary equipment should be gathered and checked. This includes an endotracheal tube (ETT), laryngoscope (either direct or video), suction devices for clearing secretions, and medications such as sedatives or muscle relaxants.
2. Performing Intubation
Once preparations are complete, the actual intubation can begin:
- Induction: If the patient is conscious or semi-conscious, medications may be administered to induce sedation and muscle relaxation.
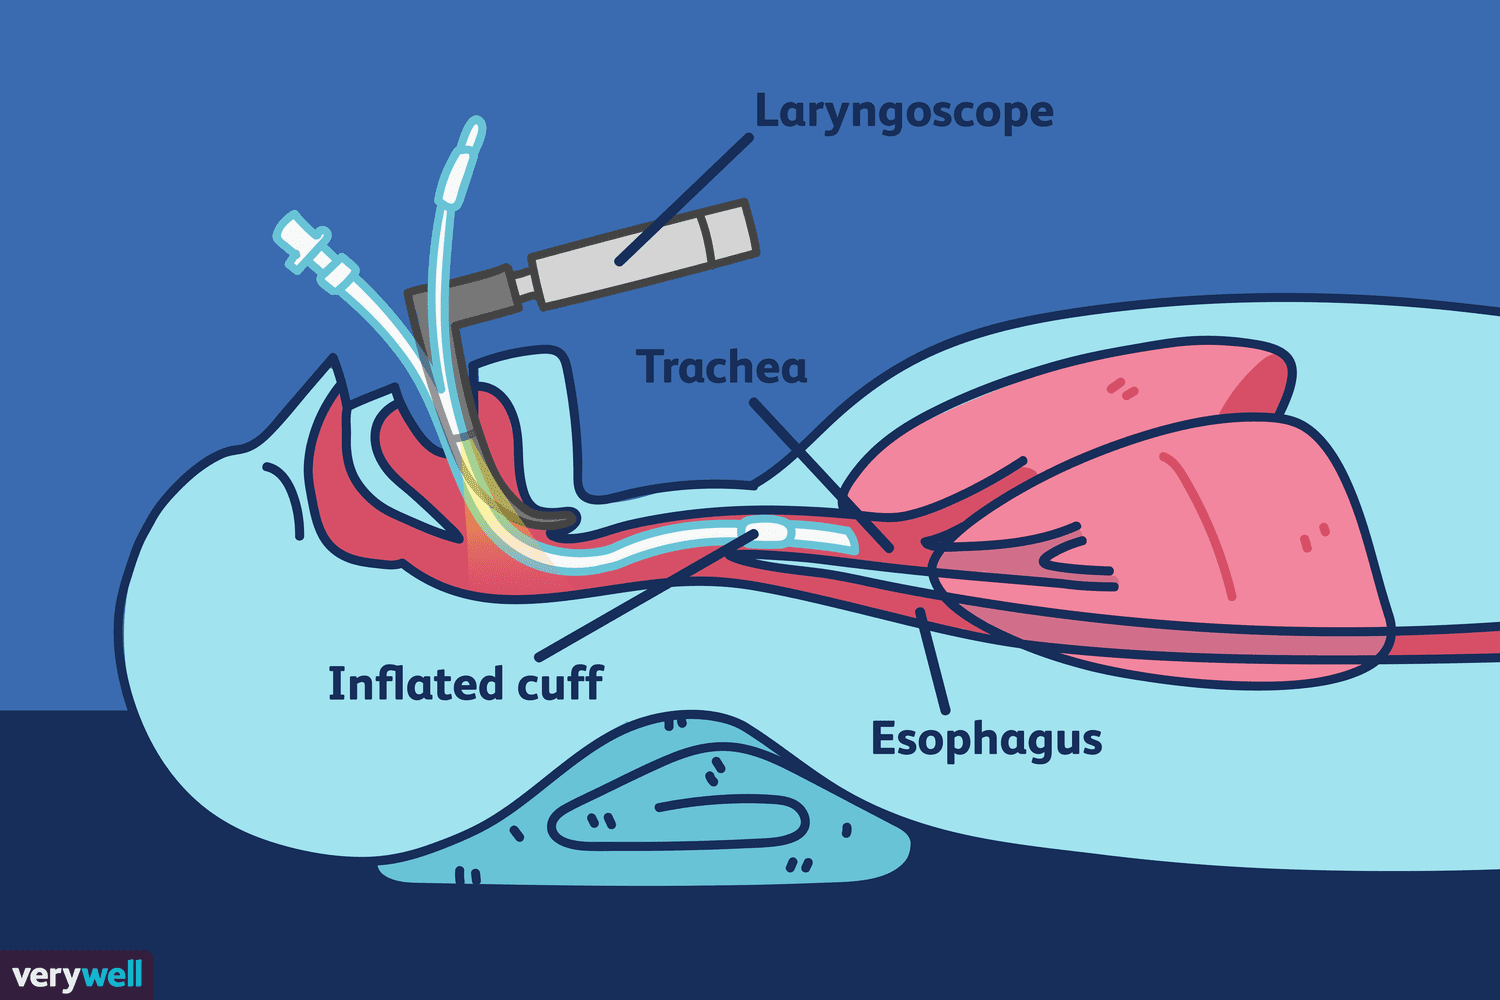
- Laryngoscopy: The healthcare provider uses a laryngoscope to visualize the vocal cords. This step may involve either direct visualization or video-assisted techniques depending on the situation and available equipment.
- Insertion of Endotracheal Tube: Once the vocal cords are visualized, the ETT is carefully inserted through the mouth (or nose in nasotracheal intubation) into the trachea. Care must be taken to avoid trauma to surrounding structures.
- Confirmation of Placement: After insertion, it is vital to confirm that the tube is correctly placed in the trachea. This can be done through various methods:
- Auscultating breath sounds bilaterally over both lung fields.
- Observing chest rise during ventilation.
- Using capnography to detect exhaled carbon dioxide.
3. Securing and Managing the Airway
After successful placement of the ETT:
- Securing the Tube: The ETT should be secured with tape or a commercial device to prevent accidental extubation.
- Ventilation Support: The tube can now be connected to a bag-valve-mask device or a mechanical ventilator for respiratory support.
- Monitoring: Continuous monitoring of vital signs and oxygen saturation is essential during this process. Any signs of distress or complications should be addressed immediately.
4. Extubation Process
When it is determined that it is safe to remove the ETT:
- Assessment for Extubation: Patients should meet specific criteria indicating they can breathe independently before extubation occurs.
- Removal of Tube: The extubation process involves gently withdrawing the ETT while ensuring that adequate ventilation continues until removal is complete.
In summary, tracheal intubation requires careful preparation, execution, and post-procedure management to ensure patient safety and effective airway management.
Anatomical Structures Seen in the Region of Intubation
When performing tracheal intubation, several key anatomical structures are visualized to ensure successful placement of the endotracheal tube. Understanding these structures is crucial for providers to navigate the airway effectively. The main anatomical landmarks include:
1. Epiglottis
The epiglottis is a leaf-shaped flap located at the root of the tongue, which covers the glottis during swallowing to prevent food and liquid from entering the trachea. Visualization of the tip of the epiglottis is critical during oral intubation, as it helps guide the laryngoscope blade into position.
2. Larynx
The larynx, or voice box, is situated just below the epiglottis and contains the vocal cords. It is essential to visualize this structure when passing the endotracheal tube through the vocal cords (glottic opening). Proper visualization of the larynx allows for accurate tube placement and minimizes complications.
3. Vallecula
The vallecula is a space located between the base of the tongue and the epiglottis. It serves as an important landmark during intubation; positioning the laryngoscope blade in this area can help lift the epiglottis and improve visibility of the larynx.
4. Arytenoid Cartilages
These paired cartilages are located at the back of the larynx and play a role in vocal cord movement. While they may not be directly visualized during intubation, their presence indicates that you are in proximity to important structures within the airway.
5. Vocal Cords (True Vocal Cords)
The true vocal cords are located within the larynx and are crucial for sound production as well as protecting against aspiration. Successful intubation requires passing through these cords into the trachea.
6. Trachea
Once past the vocal cords, you enter into the trachea, which extends down towards bifurcation into bronchi leading to each lung. Confirming placement within this structure is vital for ensuring proper ventilation.
In summary, successful tracheal intubation relies on visualizing these anatomical structures: epiglottis, larynx, vallecula, arytenoid cartilages, vocal cords, and trachea.
Laryngoscopes and Types of Blades
A laryngoscope is a medical device used primarily to visualize the vocal cords, facilitating intubation. It plays a crucial role in airway management, allowing healthcare providers to secure the airway during various medical procedures, including surgeries and emergency interventions.
Types of Laryngoscope Blades
Laryngoscope blades come in various designs, each suited for specific clinical scenarios and patient anatomies. The main types include:
- Macintosh Blade (Curved Blade):
- This is the most commonly used blade in adults. It has a curved design that allows it to lift the epiglottis indirectly, providing a broad view of the airway.
- The blade attaches to the handle at a 90-degree angle.
- Miller Blade (Straight Blade):
- This blade is particularly useful for pediatric patients as it directly lifts the epiglottis to reveal the vocal cords.
- It is designed with a straight shape and is effective for anterior airways.
- Kessel Blade:
- Similar to the Macintosh but with a slight difference in angle (110 degrees), making it suitable for specific anatomical challenges.
- McCoy Blade:
- This blade features a movable distal tip segment that can be flexed by a lever controlled by the clinician’s thumb. It helps displace the larynx forward for better visualization.
- Magill Blade:
- A straight blade with a U-shaped cross-section, often used in situations requiring direct access to the airway.
- Miller and Wisconsin Blades:
- These are straight blades with curved tips, designed for particular airway configurations.
- Hyperangulated Blades:
- These blades provide enhanced visualization for difficult airways, especially beneficial in patients with obesity or restricted neck mobility.
Materials Used in Laryngoscope Blades
Laryngoscope blades can be made from different materials:
- Stainless Steel Blades: Durable and reusable; they can be sterilized easily.
- Plastic Disposable Blades: Designed for single use, reducing infection risks in high-risk environments.
Choosing the Right Blade Size
Selecting an appropriate laryngoscope blade size is essential for effective intubation and depends on several factors such as:
- Patient age
- Weight
- Airway anatomy
For example:
- Preterm infants may require size 00 or 0 Miller blades.
- Full-term newborns typically need size 0-1 Miller blades.
- Children generally use sizes 1-2 Miller or Macintosh blades.
- Adults usually require sizes 3-4 Macintosh blades.
Correct sizing enhances visibility during intubation and minimizes potential trauma to the airway structures.
In summary, understanding the types of laryngoscope blades available and their appropriate applications is vital for successful airway management across different patient populations.
Tracheal Tubes: Size and Types of Tubes
Tracheal tubes, commonly used in medical settings for airway management, come in various sizes and types, each designed to meet specific clinical needs. The selection of a tracheostomy tube is crucial and should be based on the outer diameter (OD), inner diameter (ID), and length of the tube rather than the manufacturer’s size designation, which can vary significantly between different brands.
- Size Considerations:
- The outer diameter of a tracheostomy tube should ideally be about ⅔ to ¾ of the tracheal diameter. For most adult females, an outer diameter of approximately 10mm is suitable, while for adult males, an outer diameter of around 11mm is typically appropriate.
- The inner diameter significantly influences the work of breathing for spontaneously breathing patients. Care must be taken when assessing the inner diameter, especially in dual cannula tubes where the presence of an inner cannula may reduce the effective ID.
- Types of Tracheostomy Tubes:
- Single Cannula Tubes: These are non-fenestrated tubes with an air-filled cuff that are generally used for temporary tracheostomies during critical illness.
- Dual Cannula Tubes: These tubes have an inner cannula that can be removed quickly in case of obstruction, making them safer for patients who require prolonged use after leaving critical care.
- Fenestrated Tubes: Designed to facilitate speech and reduce work of breathing during weaning from ventilation, these tubes have openings that allow airflow through them. However, they are not recommended for newly-formed stomas due to risks associated with surgical emphysema.
- Specialized Tubes:
- Specialized tracheostomy tubes include those designed for specific conditions or patient needs such as reinforced tubes (which provide structural support), laser-resistant tubes (for use during laser surgeries), and preformed tubes like RAE tubes (used primarily in anesthesia).
Shape of Tube and Specialized Tubes
The shape and design of tracheal tubes are essential for their function:
- Arc-Shaped Design: Most tracheostomy tubes feature an arc-shaped shaft that allows easier insertion into the trachea.
- Cuffed vs. Uncuffed Tubes: Cuffed tubes provide an airtight seal necessary for positive pressure ventilation while uncuffed versions may be used in patients who do not require mechanical ventilation.
- Reinforced Tubes: These are designed to prevent kinking and maintain patency in situations where external pressure might compromise airflow.
- Laser Resistant Tubes: Constructed from materials that can withstand high temperatures without igniting or melting, these are used during procedures involving lasers.
In summary, selecting the appropriate size and type of tracheostomy tube is vital for ensuring patient safety and comfort while facilitating effective airway management.
Overview of the Laryngeal Mask Airway (LMA)
The laryngeal mask airway (LMA) is a supraglottic airway device that was developed by British anesthesiologist Dr. Archi Brain and has been in use since 1988. It was initially designed for elective ventilation in the operating room but has gained popularity in emergency settings as an important tool for managing difficult airways. The LMA serves as an alternative to bag-valve-mask ventilation, allowing providers to free their hands while reducing gastric distention.
The design of the LMA consists of a large endotracheal tube at the proximal end connected to an elliptical mask at the distal end. This structure allows it to sit in the hypopharynx and cover supraglottic structures, thereby isolating the trachea relatively well. It is crucial that patients are obtunded and unresponsive before placement of this device.
Types of Laryngeal Masks
There are several types of laryngeal masks available:
- LMA Classic: The original reusable design.
- LMA Unique: A disposable version ideal for emergency and prehospital settings.
- LMA Fastrach (ILMA): Designed specifically as a conduit for intubation, featuring an insertion handle and anatomical curvature.
- LMA Flexible: Has softer tubing but is not used in emergency settings.
- LMA ProSeal: Includes a channel for suctioning gastric contents and can withstand higher pressures without leaking, but does not allow blind intubation.
- LMA Supreme: A newer design similar to ProSeal with a built-in bite block.
- LMA CTrach: Inserts like the LMA Fastrach but includes fiberoptics with a video screen for direct visualization of the larynx.
Indications for Use
The LMA is indicated in various clinical scenarios:
- Elective Ventilation: It serves as an acceptable alternative to mask anesthesia during short procedures when endotracheal intubation is unnecessary.
- Difficult Airway Management: After failed intubation attempts, it can be used as a rescue device, particularly when patients can be ventilated but cannot be intubated.
- Cardiac Arrest Situations: The American Heart Association guidelines recognize the LMA as an acceptable alternative to intubation during cardiac arrest management, especially useful in prehospital settings where providers may have less experience with intubation.
In cases where neither intubation nor ventilation is possible, a surgical airway should be established promptly; however, if an LMA is available, it can be quickly attempted while preparing for more invasive measures.
Comparison with Oro- and Nasopharyngeal Airways
Oropharyngeal and nasopharyngeal airways are other types of airway management devices that serve different purposes compared to the LMA:
- Oropharyngeal Airways (OPA): These devices are designed to keep the oropharynx open by preventing the tongue from covering the epiglottis, which could obstruct airflow. They are typically used on unconscious patients who do not have a gag reflex.
- Nasopharyngeal Airways (NPA): These tubes are inserted through the nostril into the nasopharynx and can be used on conscious patients because they do not stimulate the gag reflex as much as OPAs do. NPAs are particularly useful when there is facial trauma or when oral access is limited.
While both OPA and NPA provide passive airway management, they do not isolate or protect the trachea like an LMA does; thus, LMAs offer more effective ventilation support in situations where traditional methods fail or are impractical.
In summary, while oro- and nasopharyngeal airways play essential roles in basic airway management, the laryngeal mask airway provides advanced options for ventilation and airway protection across various clinical scenarios.


