Cardiopulmonary Resuscitation (CPR) is one of the most critical life-saving skills a person can learn. In moments of crisis, the ability to act decisively and correctly can mean the difference between life and death.
The Conditions Which Require CPR
CPR is an emergency procedure performed when someone’s heart stops beating, a condition known as cardiac arrest. It is not intended for every medical emergency. Recognizing the specific signs of cardiac arrest is the first and most crucial step. The primary conditions requiring immediate CPR include:
- Sudden Cardiac Arrest (SCA): This is the most common reason for CPR. SCA occurs when the heart’s electrical system malfunctions, causing it to stop beating effectively. The individual will suddenly collapse, become unresponsive, and stop breathing normally. This is different from a heart attack, which is a “plumbing” problem where blood flow to the heart is blocked. However, a heart attack can lead to cardiac arrest.
- Respiratory Arrest: This occurs when a person stops breathing but still has a pulse. If not treated, the lack of oxygen will quickly lead to cardiac arrest. Causes can include drowning, choking, drug overdose, or certain medical conditions. Intervention at this stage can prevent the heart from stopping.
- Drowning: A person rescued from the water who is unresponsive and not breathing requires immediate CPR.
- Electrocution: A severe electrical shock can disrupt the heart’s rhythm and cause cardiac arrest.
- Suffocation or Choking: If an airway obstruction is cleared but the person remains unresponsive and is not breathing, CPR should be initiated.
The key indicators for starting CPR are straightforward:
- Unresponsiveness: The person does not respond to a tap on the shoulder and a loud shout of “Are you okay?”
- Absence of Normal Breathing: The person is not breathing or is only exhibiting agonal gasps. Agonal breathing is a brainstem reflex that appears as short, irregular, gasping breaths and should not be considered normal breathing.
The Significance of Oxygenation to the Body and Brain
To understand why CPR is so effective, one must appreciate the critical role of oxygen. Every cell in the human body requires a constant supply of oxygen to produce energy and function. The brain, however, is the most oxygen-sensitive organ.
When the heart stops, the circulation of oxygenated blood ceases. Without this vital supply, brain cells begin to die within minutes. This timeline illustrates the urgency:
- 0-4 minutes: Brain damage is unlikely. This is the optimal window for starting high-quality CPR.
- 4-6 minutes: Brain damage becomes possible.
- 6-10 minutes: Brain damage is probable.
- Over 10 minutes: Irreversible brain damage or death is almost certain.
CPR serves two fundamental purposes in this context:
- Chest Compressions: By manually compressing the chest, a rescuer artificially circulates the oxygen that is already present in the person’s blood. This circulation delivers essential oxygen to the brain and other vital organs, effectively “buying time” and preserving organ function until advanced medical help can arrive.
- Rescue Breaths: Rescue breaths introduce new oxygen into the lungs, which is then circulated by the chest compressions. This replenishes the body’s diminishing oxygen supply.
Together, these actions maintain a minimal but life-sustaining level of oxygenation, dramatically increasing the chances of survival and reducing the likelihood of long-term neurological damage.
Assessment and Intervention for the Adult with Respiratory or Cardiac Arrest
When faced with a collapsed adult, a systematic approach is essential. The following steps, based on guidelines from the American Heart Association (AHA), should be followed.
Step 1: Ensure Scene Safety
Before approaching the individual, quickly scan the area for any dangers to yourself or the victim, such as traffic, fire, or electrical wires. You cannot help if you also become a victim.
Step 2: Check for Responsiveness and Breathing
Kneel beside the person. Tap their shoulders firmly and shout loudly, “Are you okay?” Simultaneously, scan their chest for movement for no more than 10 seconds. Check if they are breathing normally. Remember, agonal gasps are not normal breathing.
Step 3: Activate Emergency Medical Services (EMS) and Get an AED
If the person is unresponsive and not breathing, immediate action is required.
- If you are with others, point to a specific person and direct them: “You, call 911 and get an AED!”
- If you are alone, use your mobile phone to call 911 and put it on speakerphone so you can begin CPR while talking to the dispatcher.
Step 4: Begin High-Quality CPR (Chest Compressions)
If there is no pulse and no normal breathing, begin chest compressions immediately.
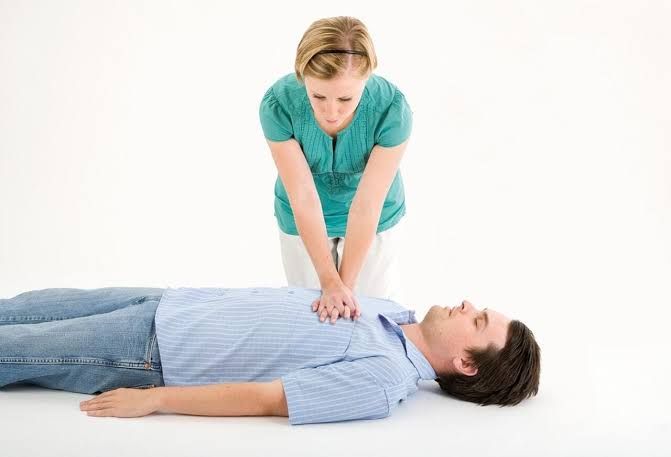
- Position: Kneel beside the person’s chest. Place the heel of one hand on the center of their chest, on the lower half of the breastbone. Place your other hand on top and interlace your fingers.
- Technique: With your arms straight and your shoulders directly over your hands, push hard and fast.
- Depth: Compress the chest at least 2 inches (5 cm) but no more than 2.4 inches (6 cm).
- Rate: Perform compressions at a rate of 100 to 120 per minute. The beat of the song “Stayin’ Alive” is a useful guide.
- Recoil: Allow the chest to fully recoil (return to its normal position) between each compression. This allows the heart to refill with blood.
Step 5: Provide Rescue Breaths
After 30 compressions, provide 2 rescue breaths.
- Open the Airway: Use the head-tilt, chin-lift maneuver. Place one hand on the person’s forehead and tilt the head back. Use the fingers of your other hand to lift the chin.
- Give Breaths: Pinch the person’s nose closed. Take a normal breath and create a complete seal over their mouth with yours. Give a breath lasting 1 second, just enough to make the chest visibly rise.
- Allow the chest to fall, then deliver a second breath.
Step 6: Continue the Cycle and Use an AED
Continue the cycle of 30 compressions and 2 breaths. When an Automated External Defibrillator (AED) arrives, turn it on immediately and follow its verbal and visual prompts. The AED will analyze the heart’s rhythm and advise whether a shock is needed. Minimize interruptions in chest compressions while applying the AED pads. Continue CPR until emergency responders take over, the person begins to move or breathe normally, or you are too exhausted to continue.
Applying the Differences: CPR for Adults, Children, and Infants
While the core principles of CPR remain the same, the technique must be adapted for children and infants due to their smaller size and different physiology.
1. Adult CPR (Puberty and Older)
- Cause: Usually a primary cardiac event.
- Activation of EMS: Call 911 immediately upon finding an unresponsive adult.
- Hand Placement: Two hands on the lower half of the breastbone.
- Compression Depth: At least 2 inches (5 cm).
- Compression-to-Ventilation Ratio: 30:2 (for one or two rescuers).
2. Child CPR (Age 1 to Puberty): The primary difference is that cardiac arrest in children is often secondary to a respiratory problem (e.g., choking or an asthma attack).
- Cause: Usually a primary respiratory event.
- Activation of EMS: If you are alone and did not witness the collapse, perform 2 minutes of CPR first, then call 911. If you witnessed the sudden collapse, call 911 first. This prioritizes providing oxygen in case of respiratory arrest.
- Hand Placement: One or two hands on the lower half of the breastbone, depending on the child’s size. Use the force necessary to achieve proper depth without causing injury.
- Compression Depth: About 2 inches (5 cm), or one-third the depth of the chest.
- Compression-to-Ventilation Ratio: 30:2 (for a single rescuer). For two rescuers, the ratio changes to 15:2 to provide more frequent oxygenation.
3. Infant CPR (Under 1 Year of Age): Infants are extremely fragile, and their emergencies are almost always respiratory in nature.
- Cause: Usually a primary respiratory event (e.g., SIDS, choking, suffocation).
- Activation of EMS: Same as for a child. If alone, perform 2 minutes of CPR before calling 911.
- Responsiveness Check: Tap the bottom of the infant’s foot and shout their name.
- Hand Placement:
- Single Rescuer: Two fingers (index and middle) in the center of the chest, just below the nipple line.
- Two Rescuers: Two-thumb-encircling hands technique. Place both thumbs side-by-side on the infant’s chest while your hands encircle their torso. This method provides better compressions.
- Compression Depth: About 1.5 inches (4 cm), or one-third the depth of the chest.
- Rescue Breaths: Do not tilt the head back too far (a neutral or “sniffing” position is best). Cover the infant’s mouth and nose with your mouth and deliver gentle puffs of air, just enough to make the chest rise.
- Compression-to-Ventilation Ratio: 30:2 (single rescuer) or 15:2 (two rescuers).
References:
- American Heart Association (AHA). (2020). Highlights of the 2020 American Heart Association Guidelines for CPR and ECC. Available at: https://cpr.heart.org/en/resources/cpr-facts-and-stats
- American Red Cross. (2023). CPR/AED/First Aid Participant’s Manual. Available at: https://www.redcross.org/take-a-class/cpr
- Panchal, A. R., Bartos, J. A., Cabañas, J. G., et al. (2020). Part 3: Adult Basic and Advanced Life Support: 2020 American Heart Association Guidelines for Cardiopulmonary Resuscitation and Emergency Cardiovascular Care. Circulation, 142(16_suppl_2), S366–S468.


