Successful kidney transplantation hinges not only on recipient preparation and surgical skill but also significantly on the meticulous and expert preparation of the donor organ on the “back-table” – the sterile field where the kidney is prepared ex vivo (outside the body) before implantation. This crucial stage allows the surgical team to carefully examine the kidney, identify and address anatomical variations, ensure vascular integrity, and repair any potential damage incurred during procurement or transport. This educational text outlines key aspects of this back-table preparation, focusing on managing common anatomical challenges, specific techniques like venous extension grafting for the right kidney, and the critical process of identifying and repairing surgical injuries.
The overall objective of back-table preparation is to present the surgeon with a renal allograft (transplanted kidney) that is anatomically suitable for safe and efficient implantation, minimizing the risk of post-transplant complications such as vascular thrombosis, urinary leaks, or graft dysfunction. This requires a thorough understanding of renal anatomy and variations, as well as proficiency in delicate vascular and urological reconstruction techniques performed under magnification.
The preparation process can be broken down into several key stages, focusing on specific challenges and techniques:
- Strategies to Deal with Common Anatomic Features including Multiple Arteries and Veins:
- Understanding Anatomic Variations
- Managing Multiple Renal Arteries
- Managing Multiple Renal Veins
- Prepare Venous Extension Grafts for the Right Kidney:
- Rationale for Venous Extension
- Indications and Graft Material
- Technical Steps of Graft Preparation and Anastomosis
- Identify and Repair Surgical Damage during Back-Table Preparation:
- Types of Potential Damage
- Systematic Identification Process
- Repair Strategies for Different Injuries
- Decision Making: When Damage Precludes Transplantation
1. Strategies to Deal with Common Anatomic Features including Multiple Arteries and Veins
While the textbook renal anatomy typically describes a single renal artery originating from the aorta and a single renal vein draining into the inferior vena cava, anatomical variations are remarkably common. These variations, particularly the presence of multiple arteries or veins, can significantly complicate the vascular anastomosis during transplantation and increase the risk of ischaemia, thrombosis, or venous congestion if not properly addressed during back-table preparation.
- Understanding Anatomic Variations:
- Accessory or multiple renal arteries are present in a significant percentage of kidneys, often arising directly from the aorta or iliac arteries and supplying specific segments of the kidney. These vessels are often smaller in calibre than the main renal artery.
- Multiple renal veins, although less common than arterial variations, can include polar veins draining the upper or lower poles of the kidney directly into the vena cava, or early branching of the main renal vein.
- Failure to recognize and appropriately manage these accessory vessels can lead to infarction of the kidney segment supplied by an unanastomosed artery or venous congestion and thrombosis if a draining vein is missed or inadequately connected.
- Managing Multiple Renal Arteries:
- The goal is to ensure adequate arterial inflow to all renal segments supplied by the donor vessels.
- Bench Aortorenal Anastomosis (Carrel Patch Technique): If the donor aorta is available, the segment containing the ostia (openings) of all renal arteries can be carefully excised as a patch. This patch is then anastomosed en bloc (as a single unit) to the recipient artery, simplifying the procedure by reducing the number of anastomoses needed on the recipient side. This is the preferred method when feasible and the anatomy allows.
- Ex Vivo Bench Anastomosis: If a Carrel patch is not feasible (e.g., specific multi-organ retrieval protocols), smaller accessory arteries can sometimes be anastomosed to each other on the back-table to create a single, larger vessel or a common ostium that can then be connected to the recipient artery. Techniques include end-to-side anastomosis of a polar artery to the main renal artery trunk or side-to-side anastomosis of two equally sized vessels. This requires meticulous dissection and fine suture techniques under magnification to avoid strictures or kinks.
- Individual Anastomosis: In some cases, it may be necessary or preferable to perform separate anastomoses for each significant artery to the recipient arterial system in situ. This might involve anastomosing the main renal artery to the recipient internal or external iliac artery and an accessory artery to a branch of the internal iliac artery (e.g., superior gluteal artery) or using a bifurcated segment of the recipient vessel. This decision is often made based on the size and location of the accessory arteries and the recipient’s anatomy, but requires careful planning ex vivo.
- Thorough flushing of each arterial branch with cold preservation solution (often containing vasodilators and heparin) during the back-table work confirms patency and helps identify any missed branches or anatomical complexity.
- Managing Multiple Renal Veins:
- The primary concern with multiple veins is ensuring complete and unobstructed venous outflow to prevent congestion and thrombosis.
- Ex Vivo Bench Anastomosis: Similar to arteries, smaller accessory renal veins or polar veins can sometimes be anastomosed to the main renal vein on the back-table to create a single venous outflow tract. This requires careful preservation of length and absence of tension.
- Individual Anastomosis: Depending on their size and confluence, separate veins might need to be anastomosed individually to the recipient iliac vein or its tributaries.
- Direct Connection to Recipient Iliac Vein: The main renal vein is typically anastomosed end-to-side to the recipient external iliac vein. If there are multiple veins exiting close together, they can sometimes be incorporated into a single larger venotomy (incision in the recipient vein).
- Careful irrigation and visual inspection of the venous system on the back-table is essential to confirm all draining vessels are accounted for and managed appropriately.
2. Prepare Venous Extension Grafts for the Right Kidney
Transplantation of the right kidney presents a specific anatomical challenge: the right renal vein is significantly shorter than the left renal vein because the inferior vena cava lies to the right of the aorta. When transplanting the kidney into the iliac fossa (the standard location), the distance from the donor renal vein to the recipient external iliac vein can be considerable, particularly in recipients with deeper pelvic structures or in specific surgical approaches. A short right renal vein can result in tension on the venous anastomosis, increasing the risk of kinking, stricture, or thrombosis.
- Rationale for Venous Extension:
- To provide sufficient length for a tension-free anastomosis between the donor right renal vein and the recipient iliac vein.
- To position the venous anastomosis optimally, avoiding compression or kinking from surrounding structures.
- Indications and Graft Material:
- A venous extension graft is commonly used when transplanting the right kidney. While not universally required in every case, its use is frequently planned or necessary if the donor vein appears short or the recipient anatomy dictates.
- Preferred Graft Material: Autologous Vein: The gold standard is to use a segment of the recipient’s own vein, typically the great saphenous vein. This ensures biological compatibility, resistance to thrombosis, and long-term patency. A suitable length (often 5-8 cm) is harvested from the thigh. The segment is carefully flushed with heparinized saline and checked for valves. If valves are present, their leaflets must be carefully excised or the graft segment must be reversed to prevent obstruction of blood flow.
- Alternative Graft Material: Occasionally, a segment of recipient internal iliac vein branch may be used. Synthetic grafts (e.g., Gore-Tex) are generally avoided for venous reconstruction when possible due to the higher risk of thrombosis compared to autologous tissue, but might be considered in rare circumstances if no suitable vein is available.
- Cadaveric Donor Iliac Vein: In deceased donor transplantation, a segment of the donor iliac vein can sometimes be used as an alternative venous conduit, although recipient saphenous vein is usually preferred due to ease of harvest and availability.
- Technical Steps of Graft Preparation and Anastomosis:
- During the back-table preparation, the recipient’s saphenous vein segment (or other chosen graft) is prepared by flushing, removing adventitial tissue near the ends, and managing valves if present.
- The proximal end of the venous graft is then carefully anastomosed end-to-end to the cut end of the donor right renal vein on the back-table using fine vascular sutures (e.g., 6-0 or 7-0 polypropylene). This anastomosis must be meticulously crafted to be wide, watertight, and free of twists or tension.
- The completed construct then consists of the donor kidney with the main renal artery and the extended renal vein (donor renal vein + venous graft).
- The length of the extension is judged carefully; it should be sufficient to reach the recipient iliac vein without tension but not so long as to create redundancy and the potential for kinking.
- Upon implantation, the renal artery is typically anastomosed first, followed by the anastomosis of the distal end of the venous extension graft end-to-side to the recipient external iliac vein.
3. Identify and Repair Surgical Damage during Back-Table Preparation
The process of organ retrieval, flushing, packaging, and transport is inherently delicate, and there is a potential for injury to the kidney or its associated vessels and ureter. A critical part of the back-table preparation is a systematic and thorough inspection to identify any damage that may have occurred and to perform necessary repairs ex vivo where possible. Early identification prevents surprises in situ and allows for controlled repair in a sterile, visualized environment.
- Types of Potential Damage:
- Vascular Injuries: Lacerations, tears, avulsion (pulling away) of vessels at their origin or ends, dissection (separation of layers) within the vessel wall, or damage to accessory vessels. These are particularly critical as they can lead to bleeding or thrombosis.
- Ureteral Injuries: Lacerations, transection (complete cut), contusion (bruising), or devascularization (loss of blood supply) of the ureter. The ureter’s blood supply is delicate and runs along its length, making it susceptible to injury during dissection. Damage here can lead to urinary leaks, strictures, and infection.
- Parenchymal Injuries: Capsular tears, surface contusions, or minor cuts to the kidney tissue itself. While less catastrophic than vascular or ureteral damage, they should still be noted and managed appropriately.
- Systematic Identification Process:
- Visual Inspection: The entire kidney surface, renal capsule, hilar structures (artery, vein, pelvis), and the full length of the ureter are meticulously inspected under good light, often with magnification. The colour, turgor, and integrity of all structures are assessed.
- Palpation: Gentle palpation can help identify areas of injury, particularly haematomas or areas of decreased turgor.
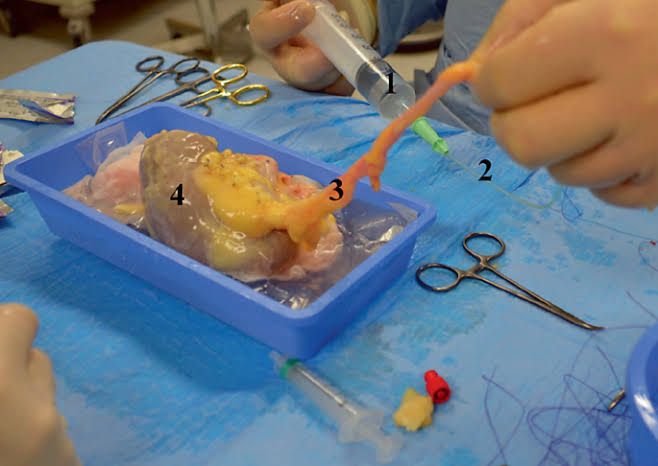
- Flushing: Flushing the kidney with cold preservation solution under controlled pressure helps assess vascular integrity. Leaks from vascular injuries become apparent. Flushing the renal pelvis and ureter (gently) can reveal ureteral leaks.
- Ureter Inspection: The ureter is examined for its colour (should be pink/well-perfused), presence of bleeding from cut ends, and any visible nicks or discontinuities along its length. Its blood supply, often visible as small vessels running along its surface, is checked for integrity.
- Repair Strategies for Different Injuries:
- Vascular Repair:
- Small tears or lacerations in technically accessible locations can sometimes be repaired with fine vascular sutures (primary repair).
- Larger defects or damage near the vessel ends may require patch angioplasty, where a small patch of donor or recipient vessel (e.g., internal iliac artery/vein or saphenous vein) or, rarely, synthetic material is sutured over the defect to widen the vessel lumen and prevent stenosis (narrowing).
- Avulsion injuries or complex damage to accessory vessels may necessitate bench reconstruction, potentially involving anastomosis techniques similar to those used for managing anatomical variations.
- Ureteral Repair:
- Sharp, clean lacerations or transections can sometimes undergo primary repair ex vivo using fine absorbable sutures, ensuring a tension-free anastomosis. A temporary ureteral stent is often placed across the repair site to ensure drainage and promote healing after transplantation.
- Contused or clearly devascularized segments of the ureter should be judiciously resected back to healthy, bleeding tissue. The remaining healthy ureter is then prepared for implantation into the recipient bladder (ureteroneocystostomy). Extensive ureteral loss may complicate the implantation procedure, potentially requiring alternative techniques like using recipient ureter or creating a conduit.
- Parenchymal Repair:
- Capsular tears can be oversewn with absorbable sutures to prevent further tearing and minor bleeding.
- Significant parenchymal lacerations that appear to extend deeply may require sutures to approximate the tissue and control bleeding, though deep renal sutures should be used cautiously to avoid damaging collecting ducts or intrarenal vessels.
- Vascular Repair:
- Decision Making: When Damage Precludes Transplantation:
- Identifying damage is also about assessing its severity and determining if the kidney remains viable and suitable for transplantation.
- Severe vascular injuries that cannot be reliably repaired on the bench and pose an unacceptable risk of thrombosis or bleeding in situ may render the kidney unusable, particularly if they involve critical vessels supplying a large portion of the parenchyma.
- Extensive ureteral damage with significant devascularization that cannot be managed with standard techniques may also lead to the decision not to transplant, although surgeons will make every effort to find a reconstructive solution if the renal parenchyma is otherwise healthy.
- The decision is complex and based on the nature and extent of the injury, the potential for successful repair, the overall quality of the organ, and the clinical context.
Conclusion
The back-table preparation of the donor kidney is a foundational component of successful renal transplantation. It is a meticulous process requiring specialized knowledge, technical skill, and careful judgement. By expertly addressing anatomical variations, preparing necessary vascular conduits such as venous extension grafts for the right kidney, and diligently identifying and repairing surgical damage ex vivo, the surgical team significantly improves the chances of a smooth implantation, minimizes early post-transplant complications, and contributes directly to long-term graft survival and function. This detailed preparation stage ensures the recipient receives the best possible allograft, optimized for function and longevity.

