Venipuncture and Intravenous Cannulation Procedure
(a) Venipuncture Procedure
- Preparation and Safety Measures
- Wear appropriate personal protective equipment (PPE), including gloves, a medical-grade face mask, and a lab coat if necessary.
- Ensure that the workspace is clean and organized.
- Gather all necessary materials: safety needles (22g or less), butterfly needles (21g or less), vacutainer tube holder, blood collection tubes, antiseptic wipes, gauze, tourniquets, and a sharps disposal container.
- Patient Identification
- Identify the patient using at least two identifiers (e.g., name and date of birth).
- Confirm that this information matches the requisition form for testing.
- Patient Comfort
- Ensure the patient is seated comfortably for at least 5 minutes before the procedure to avoid anxiety or confusion.
- Explain the procedure to the patient to reassure them.
- Site Selection
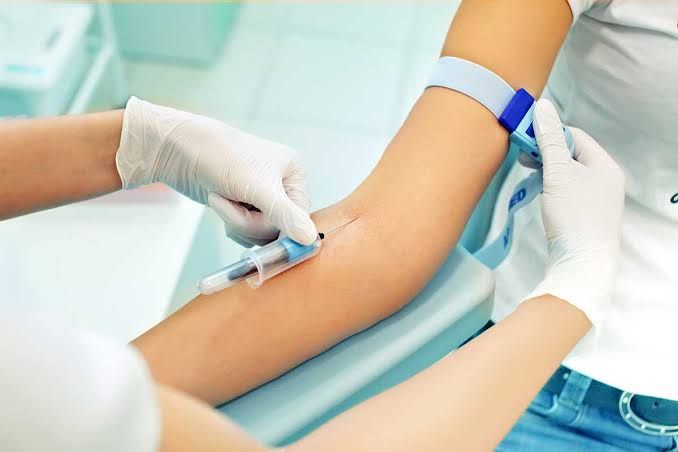
- Choose an appropriate venous access site, typically in the antecubital fossa (the crease of the elbow) where veins are more prominent.
- Palpate the vein to differentiate it from arteries and tendons; veins will feel soft and spongy while arteries are pulsatile.
- Preparation of Site
- Apply a tourniquet about 3-4 inches above the selected site to engorge the vein.
- Cleanse the puncture site with an antiseptic wipe using a circular motion from inside out; allow it to dry completely.
- Performing Venipuncture
- Hold the skin taut below the puncture site with your non-dominant hand.
- Insert the needle at a 15-30 degree angle with the bevel facing up into the vein.
- Once blood enters the tube or collection device, release pressure on the tourniquet.
- Collection of Specimen
- Fill each collection tube in accordance with established order of draw protocols to prevent cross-contamination of additives.
- After collecting sufficient blood, remove the needle swiftly while applying gauze over the puncture site immediately after withdrawal.
- Post-Procedure Care
- Apply pressure with gauze for several seconds until bleeding stops; then apply a bandage or tape.
- Dispose of all used materials in appropriate biohazard containers.
- Documentation
- Label each specimen tube accurately with patient information including name, date of birth, time of collection, and initials of phlebotomist.
- Complete any required laboratory requisition forms ensuring all necessary information is included.
(b) Intravenous Cannulation Procedure
- Preparation and Safety Measures
- As with venipuncture, wear appropriate PPE including gloves and masks as needed.
- Gather necessary supplies: IV catheter (appropriate gauge), IV tubing, saline flush solution, antiseptic wipes, tourniquet, gauze pads, adhesive tape or dressing.
- Patient Identification
- Confirm patient identity using two identifiers as previously described.
- Patient Comfort
- Explain the procedure to alleviate any anxiety; ensure they are comfortable in their position.
- Site Selection
- Select an appropriate vein for cannulation; common sites include forearm veins or dorsal hand veins.
- Palpate for suitable veins that feel soft and resilient while avoiding areas near joints or previous venipuncture sites.
- Preparation of Site
- Apply a tourniquet above the chosen site to engorge veins.
- Cleanse area thoroughly with antiseptic wipes in a circular motion from center outward; allow it to dry completely.
- Insertion of IV Catheter
- Stabilize vein by holding skin taut below insertion point with non-dominant hand.
- Insert catheter at a 15-30 degree angle until you see flashback of blood in catheter chamber indicating entry into vein; lower angle slightly as you advance further into vein if needed.
- Once confirmed in vein, advance catheter fully while holding outer hub steady; then remove needle carefully without dislodging catheter.
- Securing IV Catheter
- Attach IV tubing after flushing it with saline solution to ensure patency before connecting it to catheter hub.
- Secure catheter in place using adhesive tape or dressing ensuring no movement occurs during infusion therapy.
- Post-Procedure Care – Remove tourniquet once secured; monitor insertion site for signs of infiltration or phlebitis during use. – Document procedure details including time of insertion and any complications encountered during cannulation process.
- Monitoring Patient Response – Observe patient for any adverse reactions post-cannulation such as swelling or discomfort around insertion site; adjust care accordingly based on observations made during monitoring phase.
How to Perform Local Anesthetic Infiltration
Overview of Local Anesthetic Infiltration
Local anesthetic infiltration is a procedure where a local anesthetic agent is injected into the subcutaneous tissue surrounding a wound or surgical site to provide pain relief. This technique is commonly used for minor surgical procedures, laceration repairs, and other interventions requiring localized anesthesia.
Indications for Local Anesthetic Infiltration
Local anesthetic infiltration is indicated in various situations, including:
- Lacerations or surgically treated skin lesions
- Foreign body removal
- Incision and drainage of abscesses
Contraindications
Before performing local anesthetic infiltration, it is essential to consider contraindications:
- Absolute Contraindications: History of allergy to the anesthetic agent.
- Relative Contraindications: Large wounds that may require toxic amounts of anesthetic or wounds needing precise anatomical alignment.
Equipment Needed
- Gloves (sterile gloves are not required)
- Personal protective equipment (face mask, safety glasses)
- Antiseptic solution (chlorhexidine, povidone-iodine)
- Syringe (1 to 10 mL) and needle (25 or 27 gauge)
- Injectable local anesthetic (e.g., 1% lidocaine with or without epinephrine)
- Optional topical anesthetic (LET solution: 4% lidocaine, 0.1% epinephrine, 0.5% tetracaine)
- Tissue forceps and scalpel blade for debridement if necessary
Step-by-Step Procedure
- Patient Preparation:
- Position the patient comfortably with the wound exposed and well illuminated.
- Conduct a neurovascular examination of structures distal to the wound.
- Cleansing the Wound:
- Cleanse the skin around the wound using an antiseptic solution in outward circles from the wound edges.
- Avoid introducing cleansing agents directly into the wound.
- Topical Anesthesia (Optional):
- For children or anxious adults, soak a cotton dental pledget in topical anesthetic and place it within the wound for approximately 30 minutes.
- Local Anesthetic Injection:
- Hold the syringe at a shallow angle to the skin.
- Insert the needle directly into the exposed subdermal layer of the wound edge; do not insert percutaneously.
- Aspirate to ensure no intravascular placement occurs.
- Slowly inject the anesthetic while withdrawing the needle.
- Redirect into unanesthetized skin to maximize coverage around the entire circumference of the wound.
- Considerations for Contaminated Wounds:
- For grossly contaminated or infected wounds, consider injecting through intact skin around the wound instead of directly into it.
- Monitoring:
- Document any preexisting nerve deficits in medical records before infiltration.
- Stop if patients cannot cooperate and consider procedural sedation if necessary.
- Post-Injection Care:
- Monitor for any adverse reactions such as allergic reactions or signs of toxicity from overdose.
By following these steps carefully, local anesthetic infiltration can be performed effectively and safely, providing adequate pain control during minor surgical procedures.
How to Perform Blood Culture from Peripheral and Central Sites
1. Blood Culture from Peripheral Sites
Preparation:
- Gather all necessary equipment, including a tourniquet, 70% alcohol swabs, 2% Chlorhexidine with 70% isopropyl alcohol applicator, aerobic and anaerobic blood culture bottles, vacuette, butterfly set, clean gloves, dressing, pen, and labels.
Patient Identification:
- Follow the HFHS Patient Identification Policy to ensure correct patient identification. Label each bottle with patient information including time and date of collection.
Skin Preparation:
- Explain the procedure to the patient.
- Perform hand hygiene.
- Apply the tourniquet but do not leave it on for more than one minute.
- Palpate and select the venipuncture site before cleansing.
- Remove the tourniquet.
Cleansing the Site:
- Cleanse the selected site using a 2% Chlorhexidine with 70% isopropyl alcohol applicator for at least 30 seconds in a back-and-forth scrubbing motion.
- Allow the site to dry completely for at least 30 seconds without fanning or blowing on it.
Venipuncture:
- Put on clean gloves after hand hygiene.
- Reapply the tourniquet if necessary (but not for longer than one minute).
- Perform venipuncture using a butterfly set and vacuette. Fill the aerobic bottle first followed by the anaerobic bottle until each contains approximately 10 mL of blood.
Post-Venipuncture Care:
- Remove the tourniquet once blood flow is established.
- Hold pressure on the site after withdrawing the needle and apply a dressing.
- Dispose of used materials properly and perform hand hygiene again.
Labeling:
- Label each culture bottle immediately at the bedside with patient details and site of draw.
Sending Samples:
- Send labeled samples to the laboratory according to operational unit policy.
2. Blood Culture from Central Sites
Preparation:
- Ensure that there is an MD order specifying that blood cultures are to be drawn from a central line if line-related sepsis is suspected.
Equipment Needed:
- Gather similar equipment as for peripheral draws but ensure you have sterile connectors for drawing from vascular access devices (VADs).
Cleansing Procedure:
- Scrub the hub of the central line connection with a 70% alcohol swab for at least 30 seconds. Allow it to air dry completely without fanning or blowing on it.
Drawing Blood Cultures:
- If drawing from a VAD:
- Always draw a peripheral culture alongside it to reduce contamination risk.
- Use an adapter; do not draw directly from an old connector; replace it with a new sterile connector before drawing blood.
- Collect blood into aerobic and anaerobic bottles as per standard volume requirements (approximately 10 mL in each).
- Follow similar post-draw procedures as outlined for peripheral sites regarding pressure application, dressing placement, disposal of materials, hand hygiene, labeling, and sending samples to lab.
By following these detailed steps for both peripheral and central site blood cultures, healthcare providers can minimize contamination risks while ensuring accurate diagnostic results.
Subcutaneous, Intra-dermal, Intramuscular, and Intravenous Injection
(a) Subcutaneous Injection
- Preparation:
- Gather necessary equipment: a 25 to 30 gauge needle (3/8 in. to 5/8 in.), medication, alcohol swabs, and gloves.
- Wash hands thoroughly and put on gloves.
- Site Selection:
- Choose an appropriate site for injection, such as the outer aspect of the upper arm, abdomen (within one inch of the belly button), anterior thighs, or upper back.
- Ensure the site is free from lesions or bony prominences.
- Administration:
- Pinch the skin if the patient is thin to lift the adipose tissue away from underlying muscle.
- Insert the needle at a 45- to 90-degree angle depending on the amount of subcutaneous tissue present.
- Inject no more than 1 ml of medication slowly and steadily.
- Post-Injection Care:
- Withdraw the needle quickly and apply gentle pressure with a cotton ball or gauze.
- Dispose of the needle safely in a sharps container.
(b) Intradermal Injection
- Preparation:
- Gather necessary equipment: a tuberculin syringe (calibrated in tenths and hundredths of a milliliter) and a 26 or 27 gauge needle (1/4 to 1/2 in.).
- Wash hands thoroughly and put on gloves.
- Site Selection:
- Common sites include the inner surface of the forearm or upper back under the scapula.
- Ensure that the site is free from lesions, rashes, moles, or scars.
- Administration:
- Hold the skin taut and insert the needle at a 5- to 15-degree angle just below the epidermis.
- Inject less than 0.5 ml of medication slowly until a small bleb (blister) appears under the skin.
- Post-Injection Care:
- Withdraw the needle carefully without applying pressure to avoid bleeding.
- Observe for any immediate reactions at the injection site.
(c) Intramuscular Injection
- Preparation:
- Gather necessary equipment: an appropriate syringe (usually 1-3 ml) and a needle (22-25 gauge, depending on medication viscosity).
- Wash hands thoroughly and put on gloves.
- Site Selection:
- Common sites include deltoid muscle (upper arm), vastus lateralis (outer thigh), or ventrogluteal area (hip).
- Ensure that chosen site is free from lesions or bony prominences.
- Administration:
- For deltoid injections, locate acromion process; inject into middle third of muscle.
- For vastus lateralis, locate greater trochanter; inject into middle third of muscle on lateral side.
- For ventrogluteal injections, locate greater trochanter; inject into gluteus medius muscle using landmarks for safety.
- Insert needle at a 90-degree angle quickly and inject medication steadily.
- Post-Injection Care:
- Withdraw needle quickly and apply gentle pressure with gauze.
- Dispose of needles safely in sharps container.
(d) Intravenous Injection
- Preparation:
- Gather necessary equipment including an IV catheter or butterfly needle, tourniquet, alcohol swabs, saline flush if needed, and gloves.
- Wash hands thoroughly and put on gloves.
- Site Selection:
- Select an appropriate vein for insertion; common sites include veins in forearm or hand.
- Administration:
- Apply tourniquet above selected site to engorge veins; clean area with alcohol swab.
- Insert IV catheter at a low angle (15-30 degrees) until blood return is observed in flashback chamber; advance catheter into vein while withdrawing needle.
- Secure catheter with tape and attach IV line if needed; flush with saline if required before administering medication.
- Post-Injection Care:
- Monitor patient for any adverse reactions during administration.
- Dispose of needles safely in sharps container after use.
How to Perform Intravenous Medication Administration
1. Preparation for Administration
Before administering intravenous (IV) medication, it is crucial to prepare adequately:
- Verify the Medication: Confirm the medication order, ensuring the correct drug, dosage, route, and patient.
- Gather Supplies: Collect all necessary supplies including the IV medication, syringe, alcohol swabs, gloves, and saline flush.
- Consult the Parenteral Drug Therapy Manual (PDTM): Review the PDTM for specific guidelines related to the medication being administered. This includes indications, contraindications, dosage adjustments based on patient factors (e.g., age or renal function), and compatibility with existing IV solutions.
2. Assessing the Patient
Prior to administration:
- Check Patient Identification: Use two identifiers (e.g., name and date of birth) to confirm the patient’s identity.
- Assess IV Site: Inspect the IV insertion site for signs of infiltration or phlebitis. If there are any issues such as redness or swelling, consider starting a new IV site.
- Evaluate Patient Condition: Assess vital signs and any relevant lab results that may impact medication administration.
3. Administering the Medication
There are three primary methods for administering IV medications:
- Through a Saline Lock:
- Cleanse the saline lock port with an alcohol swab.
- Attach a syringe containing the medication to the saline lock.
- Administer the medication slowly over at least one minute unless otherwise specified in guidelines.
- After administration, flush with normal saline (NS) at the same rate as the medication to ensure complete delivery.
- Through an Existing IV Line with Compatible Solution:
- Ensure that you have verified compatibility of your medication with any existing fluids in use.
- Cleanse the port of the IV line where you will administer your medication.
- Inject your medication slowly into this port while monitoring for any adverse reactions.
- Through an Existing IV Line with Incompatible Solution:
- If administering a drug that is incompatible with current infusions:
- Stop the infusion temporarily if necessary and flush with NS before administering your medication.
- After administration of your drug, flush again with NS before resuming previous infusions.
- If administering a drug that is incompatible with current infusions:
4. Post-Administration Care
After administering an IV medication:
- Monitor Patient Response: Observe for therapeutic effects as well as potential adverse reactions immediately after administration and during subsequent assessments.
- Document Administration: Record details in patient’s medical records including time of administration, dosage given, route used, and any observations regarding patient response or side effects.
5. Follow-Up Actions
Depending on patient response:
- Be prepared to manage any adverse effects according to established protocols.
- Schedule follow-up assessments based on clinical guidelines or physician orders.
By following these steps meticulously while adhering to agency policies and protocols regarding intravenous medications, healthcare professionals can ensure safe and effective administration.
How to Perform Intravenous Infusions Including Perfusion of Fluid, Blood, and Blood Products
1. Preparation for IV Infusion
Before starting an intravenous infusion, it is crucial to gather all necessary supplies and ensure a sterile environment. The following steps should be taken:
- Gather Supplies: Collect the IV catheter, IV fluid bag (or blood product), administration set (tubing), alcohol swabs, gloves, and any other required materials such as a tourniquet.
- Hand Hygiene: Perform hand hygiene thoroughly before handling any equipment to prevent contamination.
- Check Orders: Verify the physician’s order for the type of fluid or blood product to be infused, including the rate of infusion and duration.
2. Selecting the Venous Access Site
Choosing an appropriate site for venous access is essential for successful IV therapy:
- Tourniquet Application: Apply a tourniquet above the selected site to engorge the vein and make it more visible and palpable.
- Site Selection: Preferably use peripheral veins in the upper extremities. Avoid areas of flexion or previous sites with complications.
- Cleanse Site: Use an alcohol swab to cleanse the chosen site in a circular motion from inside out.
3. Inserting the IV Catheter
Once you have prepared everything:
- Insert Catheter: Hold the skin taut and insert the catheter at a 15-30 degree angle into the vein. Once you see blood return in the flashback chamber, advance the catheter slightly further into the vein.
- Secure Catheter: While holding the catheter in place, remove the needle while keeping the catheter in position. Secure it with sterile tape or a transparent dressing.
4. Connecting IV Fluids or Blood Products
After securing the catheter:
- Connect Tubing: Attach the administration set to your IV fluid bag or blood product bag. Ensure that all connections are secure.
- Prime Tubing: Open the roller clamp on your tubing to allow fluid to flow through and eliminate air bubbles from within before connecting it to your patient’s IV line.
5. Initiating Infusion
With everything connected properly:
- Start Infusion: Adjust your roller clamp or use an infusion pump if available to start administering fluids at prescribed rates.
- Monitor Patient: Observe for any signs of adverse reactions during infusion such as fever, chills, or rash when administering blood products.
6. Monitoring During Infusion
Continuous monitoring is critical throughout this process:
- Assess Site Regularly: Check every 2 hours for signs of infiltration, phlebitis, or infection at the insertion site.
- Vital Signs Monitoring: Regularly monitor vital signs according to facility protocols during infusions.
7. Completion of Infusion
Once infusion is complete:
- Discontinue IV Access: If no longer needed, carefully remove the catheter by applying pressure above the site with gauze while withdrawing it gently.
- Apply Pressure Dressing: After removal, apply a sterile dressing over the site and instruct patients on care instructions.
8. Documentation
Finally:
- Document all relevant information regarding fluid/blood product type, volume infused, patient response, and any complications encountered during therapy.
Urethral Catheterization
Urethral catheterization is a medical procedure used to access the urinary bladder by inserting a flexible catheter through the urethra. This procedure can be performed on both males and females, but the techniques differ slightly due to anatomical variations. Below is a detailed step-by-step guide for performing urethral catheterization in both males and females.
Indications for Urethral Catheterization
- Relief of acute or chronic urinary retention
- Treatment of urinary incontinence
- Monitoring of urine output
- Measurement of postvoid residual urine volume
- Bladder irrigation or instillation of medication
Contraindications
- Absolute Contraindications: Suspected urethral injury.
- Relative Contraindications: History of urethral strictures, current urinary tract infection (UTI), prior urethral reconstruction, recent urologic surgery, history of difficult catheter placement.
Equipment Needed
- Sterile drapes and gloves
- Povidone iodine with application swabs or gauze
- Water-soluble lubricant
- Urethral catheter (size 16 French Foley catheter is appropriate for most adults)
- 10-mL syringe with sterile water (for balloon inflation)
- Local anesthetic (e.g., 2% lidocaine jelly)
- Sterile collection device with tubing
Positioning the Patient
- For males: Position the patient supine with hips comfortably abducted.
- For females: Position the patient supine in either lithotomy or frog position.
Step-by-Step Procedure for Male Urethral Catheterization
- Prepare Equipment: Place all equipment within easy reach on a sterile field.
- Attach Catheter: Connect the catheter to the collecting system without breaking the seal unless necessary.
- Test Balloon Integrity: Inflate the retention balloon with water to ensure it is intact.
- Apply Lubricant: Lubricate the tip of the catheter generously.
- Drape Patient: Cover the pelvic area with a sterile fenestrated drape, exposing only the penis.
- Grasp Penis: Use your nondominant hand to hold the shaft of the penis straight and upright.
- Cleanse Area: Using povidone iodine-soaked swabs, cleanse the glans penis in a circular motion from meatus outward.
- Administer Anesthetic: Inject about 5 mL of viscous lidocaine into the urethra using a syringe; pinch meatus closed for at least one minute to retain anesthetic.
- Insert Catheter: Hold the catheter in your free hand and gently insert it into the penile meatus while maintaining an upward angle if using a coudé catheter.
- Advance Catheter: Continue advancing until urine flows freely into the drainage bag; then inflate the balloon as per protocol.
Step-by-Step Procedure for Female Urethral Catheterization
- Prepare Equipment: Place all equipment within easy reach on a sterile field.
- Attach Catheter: Connect to collecting system without breaking seal unless necessary.
- Test Balloon Integrity: Inflate retention balloon with water to check integrity.
- Apply Lubricant: Lubricate tip of catheter generously.
- Drape Patient: Cover vulva with sterile fenestrated drape, exposing only genital area.
- Position Hands Correctly: Use nondominant hand to hold labia apart and expose urethra while keeping this hand nonsterile throughout procedure.
- Cleanse Area: Cleanse around urethral meatus using povidone iodine-soaked swabs in circular motion from meatus outward.
- Insert Catheter Gently: Insert lubricated catheter into urethra until urine flows freely; then inflate balloon as per protocol.
Post-Procedure Care
- Monitor for any signs of complications such as bleeding or infection following catheter placement.
The above steps outline how to perform urethral catheterization effectively while minimizing risks associated with this procedure.
Airway Care
Airway care is critical in emergency situations, especially when a patient is unresponsive or unable to breathe adequately. The primary goal is to ensure that the airway remains open and clear of obstructions. Below are the steps involved in performing airway care effectively:
- Assess the Situation: Before approaching the patient, ensure that the scene is safe for both you and the patient. Look for any potential hazards that could pose a risk.
- Check Responsiveness: Approach the patient and check for responsiveness by gently shaking their shoulders and shouting, “Are you okay?” If there is no response, proceed to assess their breathing.
- Open the Airway:
- If the patient is unresponsive and not breathing or only gasping, you need to open their airway using one of two techniques:
- Head-Tilt/Chin-Lift Maneuver:
- Place one hand on the forehead and apply gentle pressure to tilt the head back.
- With your other hand, place your fingers under the chin and lift it upward. This maneuver helps lift the tongue away from the back of the throat, opening up the airway.
- Jaw-Thrust Maneuver (if cervical spine injury is suspected):
- Stand at the head of the patient.
- Place your palms on either side of their head and your fingers under their jaw.
- Lift the jaw forward without tilting or moving the neck to avoid exacerbating any potential spinal injuries.
- Head-Tilt/Chin-Lift Maneuver:
- If the patient is unresponsive and not breathing or only gasping, you need to open their airway using one of two techniques:
- Check for Breathing: After opening the airway, look, listen, and feel for breathing for no more than 10 seconds. If there are no signs of normal breathing (e.g., chest rising), prepare to provide rescue breaths.
- Provide Rescue Breaths (if necessary):
- Pinch the patient’s nose shut.
- Take a normal breath, seal your lips around theirs completely, and deliver two breaths lasting about 1 second each while watching for chest rise.
- Allow air to exit before giving another breath.
- Continue Monitoring: If rescue breaths are given but do not result in chest rise after two attempts, recheck your technique—ensure proper head positioning and seal—and consider possible obstructions in case of choking.
- Use an AED if Available: If an Automated External Defibrillator (AED) becomes available during this process, use it as soon as possible while minimizing interruptions to chest compressions if CPR is being performed.
- Maintain Airway Patency: Continue monitoring and maintaining an open airway until emergency medical services arrive or until further assistance can be provided.
- Document Your Actions: Once help arrives or you have transferred care to another provider, document what actions were taken regarding airway management.
By following these steps carefully, you can effectively manage a patient’s airway in emergencies where they are unresponsive or unable to breathe adequately.
How to Perform Nasogastric Tube Insertion
Indications for Insertion Before performing a nasogastric tube insertion, it is essential to understand the indications. The procedure may be indicated for:
- Decompressing the stomach and gastrointestinal tract.
- Emptying the stomach in cases of intubation or gastrointestinal bleeding.
- Obtaining gastric contents for analysis.
- Removing ingested toxins (rare).
- Administering antidotes or oral contrast agents.
- Providing enteral feeding directly into the stomach or small intestine.
Contraindications It is crucial to recognize contraindications to avoid complications. Absolute contraindications include:
- Severe maxillofacial trauma.
- Nasopharyngeal or esophageal obstruction.
- Esophageal abnormalities such as recent caustic ingestions, diverticula, or stricture.
Relative contraindications include:
- Uncorrected coagulation abnormalities.
- Recent esophageal interventions.
Equipment Needed Gather all necessary equipment before starting the procedure:
- Protective gown, gloves, and face shield.
- Nasogastric tube (Levin tube or Salem sump tube).
- Topical anesthetic spray (e.g., benzocaine or lidocaine).
- Vasoconstrictor spray (e.g., phenylephrine).
- Cup of water and straw.
- 60-mL catheter-tipped syringe.
- Lubricant (water-soluble).
- Emesis basin and towel/blue pad for cleanliness.
- Stethoscope and tape with benzoin for securing the tube.
Positioning the Patient The patient should be positioned appropriately:
- Sit upright in a sniffing position with neck slightly flexed.
- If unable to sit up, place them in a left lateral decubitus position.
Step-by-Step Procedure
- Preparation:
- Put on protective gown, gloves, and face shield.
- Check each nostril’s patency by closing one nostril and asking the patient to breathe through the other.
- Anesthesia:
- Spray topical anesthetic in the chosen nostril and pharynx at least 5 minutes prior to insertion.
- Vasoconstriction:
- Optionally apply vasoconstrictor spray in the nostril to reduce swelling.
- Measuring Tube Length:
- Estimate proper insertion depth by measuring from the tip of the nose to earlobe then down to xiphoid process plus an additional 6 inches; mark this distance on the tube.
- Lubrication:
- Apply lubricant on the tip of the nasogastric tube.
- Insertion:
- Gently insert the tube into the chosen nostril aiming back and down along the floor of nasal cavity while feeling mild resistance as it passes through nasopharynx.
- Encourage swallowing by having the patient sip water through a straw during advancement of the tube into esophagus until reaching marked depth.
- Confirmation of Placement:
- Assess placement by asking if they can speak; inability indicates possible tracheal placement requiring immediate removal.
- Inject 20–30 mL of air while listening with a stethoscope under left subcostal region; a rush sound confirms gastric placement.
- Aspirate gastric contents if necessary; note that sometimes no contents may be aspirated even if correctly placed.
- Securing Tube:
- Securely attach nasogastric tube using adhesive tape; apply benzoin if available for better adhesion.
- Final Checks:
- If intended for feeding or medication administration, consider confirming placement with a chest x-ray for definitive verification.
By following these steps carefully, you can perform a nasogastric tube insertion safely and effectively while minimizing risks associated with improper placement or complications during insertion.
Completing a Laboratory/Histopathology Form for Relevant Disease
Completing a laboratory or histopathology requisition form is a critical step in ensuring that specimens are processed accurately and efficiently. This process involves several key components that must be filled out correctly to avoid delays or issues with specimen processing. Below is a detailed step-by-step guide on how to complete this form effectively.
Step 1: Patient Information
- Patient Name/Address: Clearly write the full name of the patient as it appears on their identification documents. Include the complete address to ensure proper identification and correspondence.
- Date of Birth: Enter the patient’s date of birth in the format requested (e.g., MM/DD/YYYY) to provide an additional identifier.
- Sex: Indicate the sex of the patient, which can be important for certain diagnostic tests.
Step 2: Clinical Information
- Clinical History: Provide relevant clinical information about the patient’s medical history, including any previous diagnoses, treatments, or surgeries that may relate to the current specimen being submitted.
- Specimen Source/Site: Specify where the specimen was obtained from (e.g., left lung biopsy, skin lesion from right arm). This information helps pathologists understand the context of the sample.
Step 3: Tests Requested
- Tests Requested: Clearly list all tests that are being requested for this specimen. Be specific about what you want to be analyzed (e.g., histological examination, immunohistochemistry).
Step 4: Requesting Physician Information
- Requesting Physician Name/Address/Phone Number: Include your full name, address, and contact number. This allows laboratory personnel to reach out if there are questions or issues regarding the specimen.
Step 5: Facility/Hospital Information
- Facility/Hospital Name and Identification Number: Write down the name of the facility where you practice and its corresponding identification number if applicable. This helps in billing and tracking purposes.
Step 6: Insurance Information
- Insurance Information: Fill out any required insurance details as per hospital admission forms. This ensures that billing processes can proceed smoothly without delays due to missing information.
Step 7: Specimen Labeling Requirements
Ensure that each specimen container is labeled correctly according to guidelines set by authoritative bodies such as The College of American Pathologists (CAP). Each label should include:
- Patient Name
- At least one unique second identifier (such as Date of Birth, Facility/Hospital Patient Number, Requisition Number, or Accession/MRN Number).
The primary container holding the specimen should have these identifiers clearly marked.
Step 8: Review for Completeness
Before submitting:
- Double-check all entries for accuracy.
- Ensure that no fields are left blank unless they are optional.
- Confirm that all identifiers match between requisition form and specimen labels.
By following these steps meticulously, you can ensure that your laboratory/histopathology requisition form is completed correctly, minimizing potential delays in processing and analysis of specimens.

