An episiotomy is a surgical incision of the perineum and posterior vaginal wall, performed during the second stage of labor to enlarge the vaginal orifice. While its routine use has declined in favor of a more restrictive approach, the procedure is still indicated in specific clinical scenarios, such as fetal distress, shoulder dystocia, or when an instrumental delivery is required. The proper repair of an episiotomy is a fundamental skill in obstetrics, critical for restoring anatomical integrity, preventing long-term morbidity, and ensuring optimal functional and cosmetic outcomes for the patient.
Phase 1: Preparation and Assessment
Before any suturing begins, a systematic approach to preparation is essential for a successful repair and patient safety.
1. Ensure Adequate Analgesia and Patient Comfort: The repair should be a painless procedure. If the patient has a functioning epidural, a top-up dose may be administered. If not, local anesthesia is required. The most common agent is 1% lidocaine (or a similar local anesthetic), which can be infiltrated systematically into the tissues surrounding the incision. Using a fine-gauge needle, inject subcutaneously along the skin edges and then deeper into the perineal muscles and vaginal mucosa. Aspiration before injection is crucial to avoid accidental intravascular administration. It is vital to wait several minutes for the anesthetic to take effect.
2. Establish an Aseptic Environment: Proper surgical technique begins with creating a sterile field. The clinician should wear sterile gloves and use sterile instruments. The perineal area should be cleansed with an appropriate antiseptic solution. Adequate lighting is paramount; a dedicated surgical lamp should be positioned to provide clear visualization of the entire wound, particularly the apex of the incision within the vagina. The patient should be positioned comfortably in the dorsal lithotomy position to provide optimal exposure.
3. Comprehensive Assessment of the Incision: A thorough examination must be conducted to understand the full extent of the tissue disruption.
- Identify the Apex: The first and most critical step is to visualize the apex (the highest point) of the incision within the vagina. Inadequate identification can lead to incomplete closure, resulting in potential hematoma formation or infection.
- Determine the Depth: An episiotomy is typically classified as a second-degree tear, meaning it involves the vaginal mucosa, perineal skin, and underlying perineal muscles (bulbocavernosus and superficial transverse perineal muscles). It is crucial to confirm that the incision has not extended into the anal sphincter (third-degree tear) or the rectal mucosa (fourth-degree tear). A digital rectal examination at this stage can help assess the integrity of the anal sphincter.
- Achieve Hemostasis: Before suturing, identify and control any active bleeding points. Gentle pressure with sterile gauze is often sufficient, but occasionally, a specific vessel may need to be individually ligated.
Phase 2: The Surgical Repair Technique
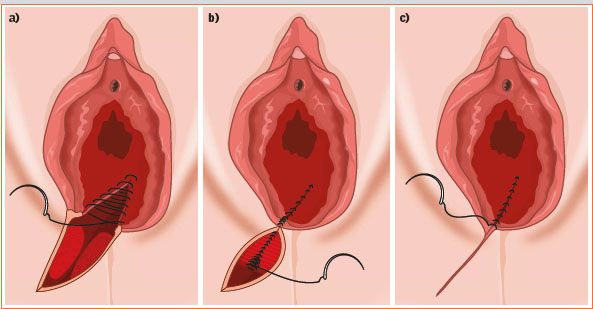
The goal of the repair is the anatomical reapproximation of each tissue layer—vaginal mucosa, perineal muscles, and perineal skin—to restore the perineal body. The most commonly used suture material is a synthetic, absorbable polymer such as polyglactin 910 (Vicryl) or polyglycolic acid (Dexon), typically in a 2-0 or 3-0 gauge.
Step 1: Closure of the Vaginal Mucosa The repair begins from the inside out, starting at the apex of the vaginal incision.
- Anchor Suture: Place the first stitch approximately 1 cm above the apex of the incision. This anchor stitch secures the suture in healthy, undisrupted tissue and helps control any bleeding from the small arterioles that often retract at the apex.
- Continuous Suture: Close the vaginal mucosa using a continuous, non-locking or locking stitch. A continuous suture is generally preferred as it is quicker, uses less foreign material, and can provide better hemostasis compared to interrupted sutures. Stitches should be placed close together, ensuring the edges of the mucosa are everted slightly for optimal healing.
- Proceed to the Hymenal Ring: Continue the suture line down to the level of the hymenal ring (the vaginal introitus). Upon reaching the hymen, the needle can be brought out through the perineal skin and the suture held with a clamp while the next layer is addressed.
Step 2: Reapproximation of the Perineal Muscles This is the most critical step for restoring the structural integrity and function of the perineal body. Failure to properly repair this layer can lead to perineal weakness, prolapse, and dyspareunia (painful intercourse).
- Identify Muscle Layers: Using forceps, gently identify the cut edges of the bulbocavernosus and superficial transverse perineal muscles.
- Interrupted or Continuous Sutures: This layer can be closed with several deep, interrupted sutures or by continuing with the same suture used for the vaginal mucosa in a deep continuous fashion. Interrupted sutures, often in a figure-of-eight pattern, are effective at bringing the muscle tissue together without causing strangulation and eliminating any potential dead space where a hematoma could form.
- Rebuild the Perineal Body: Each stitch should aim to rebuild the bulk of the perineal body, ensuring that the muscles are accurately aligned to their original anatomical position. Take care not to place sutures too tightly, as this can cause tissue ischemia and increased postoperative pain.
Step 3: Closure of the Perineal Skin The final layer is the skin. The primary goal is a cosmetically acceptable closure that minimizes patient discomfort.
- Subcuticular Suture (Preferred): The modern standard of care is a continuous subcuticular suture. Using the same thread from the muscle layer, the needle is passed back and forth just beneath the dermal layer of the skin. This technique brings the skin edges together neatly without any visible external sutures, which reduces irritation, improves cosmetic results, and eliminates the need for suture removal.
- Interrupted Sutures (Alternative): Alternatively, the skin can be closed with loose, interrupted transdermal sutures. While effective, this method can cause more discomfort and “railroad track” scarring. If used, knots should be tied loosely to account for postpartum perineal edema.
- Final Knot: The repair is completed by tying the final knot. For a subcuticular closure, the knot is often buried or placed discreetly at the inferior end of the incision or near the hymenal ring.
Phase 3: Post-Procedure Final Checks and Patient Care
The procedure is not complete until a final, thorough check has been performed.
1. Final Inspection and Rectal Examination:
- Visually inspect the entire repair for hemostasis, ensuring there is no oozing or active bleeding.
- A digital rectal examination is mandatory. This final check is performed to ensure that no sutures have inadvertently passed through the rectal mucosa. If a suture is palpated, it must be removed and replaced immediately to prevent the formation of a recto-vaginal fistula, a devastating complication.
2. Postoperative Care and Counseling: The patient should receive clear instructions on perineal care to promote healing and comfort.
- Pain Management: Recommend regular oral analgesia, such as paracetamol and non-steroidal anti-inflammatory drugs (NSAIDs).
- Hygiene: Advise the patient to keep the area clean and dry. Gentle cleansing with water during urination or after a bowel movement and patting dry is sufficient.
- Ice Packs: Applying ice packs or cold gel pads to the perineum for the first 24-48 hours can significantly reduce swelling and pain.
- Bowel Management: Prescribe stool softeners to prevent constipation and straining, which can put stress on the suture line.
- Follow-Up: Instruct the patient on the signs of infection (e.g., increasing pain, redness, purulent discharge, fever) or wound breakdown (dehiscence) and when to seek medical attention.
In conclusion, the successful repair of an episiotomy is a meticulous procedure that relies on a sound understanding of perineal anatomy, adherence to aseptic surgical principles, and a layered approach to tissue reapproximation. When performed correctly, it restores function, minimizes patient discomfort, and contributes significantly to a positive postpartum recovery.
References
- American College of Obstetricians and Gynecologists. (2018). ACOG Practice Bulletin No. 198: Prevention and Management of Obstetric Lacerations at Vaginal Delivery. Obstetrics & Gynecology, 132(3), e87-e102.
- Royal College of Obstetricians and Gynaecologists. (2015). The Management of Third- and Fourth-Degree Perineal Tears. Green-top Guideline No. 29. RCOG Press.
- Cunningham, F. G., Leveno, K. J., Bloom, S. L., Spong, C. Y., & Dashe, J. S. (2018). Williams Obstetrics (25th ed.). McGraw-Hill Education.
- Kettle, C., & Tohill, S. (2011). Perineal care. BMJ Clinical Evidence, 2011, 1401.
- East, C. E., Begg, L., Nambiar, P., & Colditz, P. B. (2012). Continuous versus interrupted sutures for repair of episiotomy or second-degree tears. Cochrane Database of Systematic Reviews, (12), CD000947.

